|
Historically speaking the Double Bridle was used in the tradition of fighting on horse back, which required the rider to hold the reins in one hand and a weapon in the other. Interestingly the Spanish Riding School in Vienna observes the rule that left hands must meet when yielding to another rider. This signifies peaceful approach, meeting with the rein hand not with the weapon hand! The double bridle as we know it today can be accredited to the two Germans, Colonel Spohr and Richard Schoenbeck. The noseband was designed to duplicate the concept of the cavesson used by the masters of old. |

|
In countries like Spain and Portugal the double bridle is introduced early on in the horse’s education whereas other classical institutions prefer to use it once the horse is confirmed in all his work in a snaffle. The reason being that the jointed snaffle has a uni-lateral action, which enables the rider to work each hind leg separately and to laterally bend the horse and prepare the horse through flexing and half halting for the curb bit. Dressage Trainer Karl Mikolka and one time rider at the Spanish Riding School in Vienna writes “One can further clarify the concepts by saying that the snaffle predominantly works the muscles of the horse, while the curb affects the skeleton and joints.” This is why it is so important to have the necessary gymnastic preparation of the horse in the snaffle before adding the curb bit to form the double bridle. In dressage competitions the double bridle can be used at elementary level because the horse should at this stage be showing the early stages of collection, which allows him to carry out the movements with ease. The horse should have also acquired greater muscular development than that of a horse working at novice level. This is a good guideline as to when to introduce your horse to a double bridle for dressage. Personally I do not advise rushing into the use of the double and I think that there is a temptation to use it too early. At Advanced level the double is compulsory which can be a problem if you have a horse that has a fatter, shorter mouth than other breeds as he will find it difficult to accept two bits. This then limits you as far as competing is concerned so you will have to experiment with various different combinations that are thinner (beware as these can be sharper) until you find the right one and do seek professional advice. Purpose:In either case when we put a bridle and bit on a horse there are seven points of control. These are:
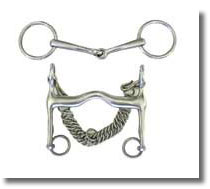
The basic snaffle acts on the bars, lips and tongue. The effect is to raise the head via the action to the lips and to have an inward action via the pressure to the bars and tongue. It must be remembered that these pressures are the ones applied through correct riding; any bit is severe if the hands at the end of the reins are severe! The curb bit acts on the bars, tongue, roof of mouth (if port is large enough), curb groove and poll which in all has the affect of inviting the skeleton of the horse to work more via increased flexion through the poll and hind legs. Fitting and Introducing a Double Bridle:The key is to use the type of bit that suits the individual character and needs of your horse. The double should be introduced gently to the horse, whether for showing or dressage. One idea is to ride the horse in the double for the first few times, with the curb rein loose, and just allow him to feel comfortable with the two bits in the mouth - maybe even a couple of hacks around the block. One has to be careful when picking up the curb rein as many horses shrink back a way from the bit upon feeling the pressure, which can cause problems later on. Also if your horse overbends and sits behind the bit and your leg in an ordinary snaffle he will be much more likely to do this in a double bridle, which will compound the problem. The two bits used for the double bridle are called the Bridoon (snaffle) and the Weymouth (curb). As with individual bits there are various types of each of these bits. These would include the loose or fixed ring, single or double jointed bridoon. In general the Bridoon is thinner than the snaffle that was to be used on its own. The Weymouth variations include the sliding or fixed cheek. The fixed cheek has a more direct action with no play whereas the sliding cheek allows more play but has increased leverage. The severity of the Weymouth depends upon the length of the shank. The same rules apply to fitting the bridoon as to the snaffle, although some suggest that the bridoon should be a quarter of an inch longer. The Weymouth should lie where the lips begin without pinching them. The curb chain on the double should never become activated before the bit can transmit the rein pressure to the mouth. As a general rule of thumb the shank of the curb bit should come to 45 degrees to the line of the mouth before the curb chain comes into contact with the curb groove. As said earlier curb chains can be covered or uncovered and have a flylink in the centre – it’s a single link that hangs down and takes a lip strap, which helps to keep the chain in the correct place and lying flat. Make sure that it does not press into the chin groove and pinch the horse or that it is so loose that it jingles about. Holding the reins of the double bridle correctly: |
 |
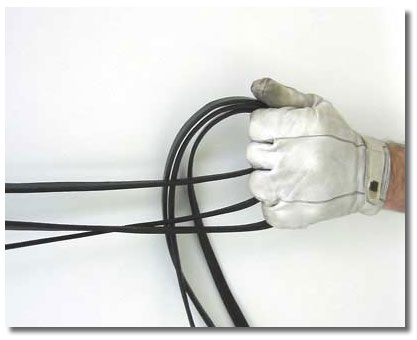
There are various ways of holding the reins of the double bridle. The standard way is to have the left bridoon and curb rein in the left hand, with the right bridoon and curb rein in the right hand. The sequence coming from the bottom up is the snaffle rein, then little finger and then the curb rein, laying where the normal snaffle rein would be placed. This means that from the bridle the two reins have crossed over. This is called the “2 and 2” method. Fig. 1 - "2 and 2" Method |
|
The more classical method is called the “3 and 1”. This is where three reins are held in the left hand with the sequence being, again from bottom up, left snaffle, little finger, left curb, ring finger and then right curb. The right hand holds the right Bridoon rein and the whip. One of the reasons for this relates back to the actions of the bit. The snaffle has the uni-lateral action and as such should be held in two separate hands. The curb bit having a bi-lateral action can be held in the one hand. Another key point to remember with this technique is that the left hand should be held centrally over the withers.
|

Fig. 2 - "3 and 1" Method |

|
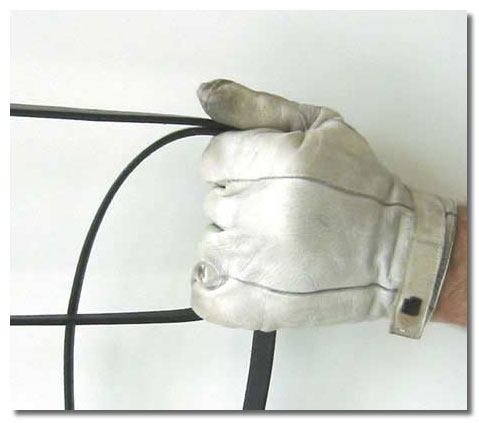
The third technique is called the “Fillis” method. This is where the reins are held with left bridoon and curb in left hand but this time in contrast to the “2 and 2” the curb rein comes under the little finger and comes up through the hand whereas the bridoon rein comes over the top of the fist and comes down through the hand. This allows the rider to “play” the bridoon off against the curb and vice versa. Fig. 3 - The Fillis Method |
