
The Rider's Seat.
Many books tell us how important it is to sit correctly. This is for a very good reason. The majority of problems rider's face when working their horses i.e. hollow, rushing, lack of forward urge, no bend, overbent, crookedness can usually be traced to the rider's incorrect position, faulty contact and lack of co-ordination.
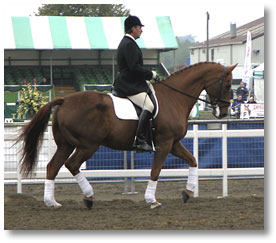
Horses are very perceptive creatures and will mirror the rider's ability. Sometimes we see horses going around that to the less trained eye look perfectly fine despite the rider's bad position. That is because the novice rider's knowledge only sees the desired head carriage as an end result. Those riders do not understand what it is like to have a really obedient, supple and flexible horse. Instead they have a short striding choppy horse that is always on the forehand and not in balance. This can in the long run have a bad effect on the horse physically and will not prolong and promote healthy joints or a happy, relaxed horse. Here we have the correct position, as demonstrated by Simon warming up "Ollie" at the National Championships. In order to get a feeling for the right position when sitting in the saddle, bring the knees up to the pommel and then try to lower the bottom into the deepest part of the seat of the saddle then let the legs drop long down the horses' side. This will initially start you off with the feeling of the seat bones being in the correct part of the saddle.
 |
Get a friend to hold the horse whilst you practice unless you are sure that he is totally safe.
1. The seat is made up from three points:- the two seat bones and the thoughts of the coccyx stretching down to the saddle. These three points together make a triangle, but with the majority of weight spread over the two seatbones. This then gives the basis around which the rest of the position can be built.
2. The hips should be vertical to the saddle and the triangle of the seat. In other words if the hips come behind this vertical line the rider will find himself in the chair seat, which is a very common and ugly riding problem. REMEMBER make sure that you are sat level. A crooked rider makes a crooked horse. Many equine osteopaths see unequal muscle build up on numerous horses' spines. REMEMBER if not due to injury, it is caused by the crookedness of the rider. REMEMBER however subtle the crookedness is, the horse will detect it and go accordingly.
3. The thigh should be relaxed and lay against the flap of the saddle. The knee should be turned in without gripping. In days gone by it was taught that the knee should grip the saddle, this would lead to the riders lower leg coming away from the horses side and thus not maintaining a constant contact. The opposite, which was that the rider's knee should be turned away from the saddle led to two problems. The first being that the lower leg was too far forwards and second being that the movement through the hips then becomes restricted. The knee should be bent allowing for the lower leg to be angled down by the horse's side. REMEMBER when the knee is too straight the shock absorbing capability goes and the seat ends up being pushed up out of the saddle, (this is one of the main causes of the rider not being able to sit to the trot or the canter). As you sit in the saddle try and think of the lower leg angling backwards and the knee dropping down in a similar fashion to the action of when you start to knee l down in front of a table. As you can see this rider has no angle to the lower leg and therefore will not have a deep seat and an ability to absorb the horses movement.
 |
4. The calf muscle needs to be stretched down (not forced down as this will create tension as shown above). This enables the rider to give clear and distinctive leg aids, which will in turn ensure that the horse will go forwards from the riders leg. For this to happen, the heel of the rider must be down. So many times we see the heel of the rider gripping up in the riders effort to give a leg aid. The horse ignores this repeated signal because with the heel up and the calf muscle slack the leg aid is more of a rub than a signal and so not only does the horse not respond but also sometimes the rubbing can chafe the hair away from his sides.
When the leg is long and the heel down, the calf muscle is slightly taught and so therefore can give a clearer, more defined leg aid that the horse has no excuse but to listen.
Rider's Upper Body
 |
1. The general point of view is that the back of the rider should stretch up as tall as possible, but when you try this on the horse you will probably feel that the small of the back pushes forwards and in your effort to force the upward stretch you come off your seat bones. Try gradually stretching tall from the waist upwards and letting the small of the back come out and meet the back of the breeches whilst still maintaining the weight on the seat bones. REMEMBER the reason why we need a straight upper body and good abdominal and lumbar muscles is to help us maintain a deep and influential seat.
REMEMBER if you collapse in your tummy, which is a common fault, your seat will lack stability and you will end up gripping with hands and legs. However light you think you are being with your hands the horse will think otherwise. REMEMBER also the back must remain upright in order to allow the rider to use the small of the back as an aid to prevent the horse from pulling you out of the saddle if he leans on the reins. That is why a rider with a good seat and straight upper torso does not need to rely on his hands and legs alone to control the horse. Another fault to watch out for is stiffness in your hips, if this is the case your horse will not find you very comfortable to carry and will stiffen his back making you bounce even more. REMEMBER even subtle stiffnesses anywhere in the rider's body will be felt by the horse and inevitably hamper progress.
Here we can see that the rider is perched forward onto her knee and thigh and so must rely more on the reins. The result from the horse is stiffness and note that the horses tongue is coming out to the side in evasion.
2. The shoulders need to be relaxed back and down, with the chest expanded. Try not to open the chest by pulling the shoulder blades tighter together. Firstly keep the shoulder blades as wide as possible then expand your chest. You will feel taller, but still supple through the upper torso and at the same time you will have lifted your diaphragm which will enable you to breath more deeply and correctly. (See "The Alexander Technique"). This will help you to get the feeling of lifting the diaphragm and true straightness without tension in the upper body. REMEMBER Rounded shoulders make it impossible to use your upper body effectively on the horse.
3. The neck should be in the back of the collar and the head held tall and central as if someone is gently pulling your head higher. REMEMBER the head is the heaviest part of your body and so if this is out of place so will the rest of your position. (See "The Alexander Technique")
4. From the shoulder the upper arm should hang straight down by your side, to a well bent elbow. Try and release all of the tension from the base of the neck, across the back of the shoulders, down the upper arm and out of the elbow. With the central part of the upper body as tall as possible this should all hang gently down. (Most riders say that they are riding with a really soft contact because they feel their hands are still and fingers are mobile, but if from the neck down to the elbow is tight, as with most people it is, then the horse will quickly learn that they can lean or pull against the rider). Combine tight shoulders, looking down, a collapsed tummy and tight hips with the aforementioned and you will realise why you are having problems schooling your horse.
 |
The riders faults in the upper body as listed above have led to this horse becoming overbent and moving quite clearly on the forehand.
5. The forearm and wrist should be straight but without tension and with the fingers wrapped around the reins and the thumb resting on top, pointing down towards the horse's mouth. If you find that you are prone to letting your reins slip longer then you are probably either riding with the reins on the fingertips or your hand is too loose and the thumb is not sat on top of the rein. The hands should be held out in front of you and should be approximately a hands width above the withers and the horses bit width apart.
When you go through the above and piece it together you will find that you will have a comfortable, safe and potentially much more effective position. Any adverse tension in the body due to stress, fear or even too much effort will hinder the progress of developing your seat. REMEMBER that you must take responsibility for the effectiveness and suppleness of your own body. However good your trainer is, he or she needs your commitment and acceptance that you need to change because it is not always your horse's fault. Sadly it is almost never your horse's fault. You can video each other and study how you see yourself and try a little each day to rectify the faults. No one was born with a supple, deep seat they all had to work at it. It will be worth it, I promise!!
GOOD LUCK and e-mail me if you are still unsure. I have put REMEMBER to help you compile a checklist, I am more than happy to answer any of your questions no matter how large or small. If you would like me to critique your position and show you the way forward for you and your horse I would be happy for you to send me a video for me to give a personal analysis. The fee for this is �15.00. Contact me via e-mail for further details. The above pictures have been selected at random. They have only been used to highlight positional errors and are not meant in a negative way towards the individual riders.